Security

Sandbox access and Reference code/client

In order to help you integrate to our PSD2 APIs, we have made a reference client, which integrates to the APIs.
The reference client is written in .NET core, and should be able to run on the most common platforms. A Dockerfile is also provided in case the client does not run on your specific machine.
You can download the ZIP file here.
You should start by reading the ReadMe.txt file after you have unpacked the file.

If you want to access Sandbox, Bankdata will provide you with information on x-api keys, callback URI etc.
The test-certificate is embedded in the zip-file mentioned above.
FYI it is not possible to use your own test-certificate or production-certificate in Sandbox.

Security

A Third Party Payment Service Providers (TPP) integrating with the PSD2 APIs provided by Bankdata must implement a number of flows to authenticate itself and to perform PSD2 operations on behalf of a Payment Service User (the PSU), as described in the Berlin Group Specification.

Initally, the TPP will need to register an account with Bankdata, providing the eIDAS certificate issued to the TPP.
Additionally, the TPP must register one or more valid Redirect URIs used in flows where the PSU is involved.
When the TPP accesses live data, we do not allow localhost URI or an ip-address as a Redirect URI.

Once registered, the TPP will receive a confidential API key (unique per TPP and application) that must be provided when calling the PSD2 API endpoints.

The eIDAS certificate contains the client's distinguished name, which Bankdata will use as the unique identifier for the TPP. It also specifies the PSD2 scopes the TPP is authorized to use (i.e. account information and payments). Finally, the certificate and the private key will be used for establishing a mutual TLS connection, effectively guaranteeing the authenticity of the TPP client when it connects to the API endpoints.

The next required step for the TPP is to authenticate against the relevant (bank specific) authentication endpoint, request one or several scopes and receive a time-limited access token in return.
This 2-legged(*) access token authorizes the TPP to make subsequent PSD2-specific calls within the granted scopes.

The access token can be used for multiple PSD2 operations (even related to different PSUs). No refresh token is issued, but it is always possible to obtain a new access token, using the mutual TLS channel as means of authentication.

When the TPP makes requests on behalf of a specific PSU, multiple flows can be utilized, depending on the scope of the operaton.
In either case, the TPP will first (based on previous interaction with the PSU) initialize the flow by sending the relevant information (e.g. account or payment information) for the transaction/operation to the relevant PSD2 API.

In return, the TPP will receive an id that can be used to initiate the authorization that the PSU must make for the operation to be carried out. This authorization happens through redirection of the PSU's user agent (browser) in accordance with the OAuth 2 standard, so that the PSU - tranparently to the TPP - performs the authorization directly against the PSD2 service (possibly using an external authentication provider).

Once completed, control is handed back to the TPP (again using redirection, via one of the TPP's pre-registered redirect URIs). If successfully authorized by the PSU, the redirect will provide an authorization code that the TPP can use to obtain a 3-legged(**) access token, which in turn is needed to perform the specific PSD2 operation that the PSU has approved (in particular account information requests).

For account information this can consist of multiple account enquiries over time (the access token will have a limited lifespan, but a refresh token will also be provided, making it possible for the TPP to obtain a new access token when needed). For payments/confirmation of funds, the access token is tied to the specific payment/CoF authorization (a new PSU authorization flow is always required for each new payment/CoF). Note that for payment/CoF the 2-legged access token should still be used for querying status on the payment/CoF.

(*: "2-legged" refers to the two parties involved: The TPP and the OAuth service)
?(**: "3-legged" refers to the three parties involved: The TPP, the PSU and the OAuth service.)

Enforce new login
If 2 PaymentServiceUsers are using the same device, and you want to enforce a new login, you can do so by adding an extra parameter when calling the authorization_endpoint:

prompt=login

This enforces a login with Strong Customer Authentication.

eIDAS and mutual TLS

In accordance with the Berlin Group Specification, our APIs are available to TPPs that have registered an account by providing a valid eIDAS certificate. All communication (except for requests against certain open endpoints) is required to run securely over a mutual TLS connection, using the registered certificate. This ensures the secrecy and integrity of transmitted data as well as the authenticity of the TPP client connecting to the APIs.

Please notice that Bankdata will uniquely identify a TPP by the client id found in the OID 2.5.4.97 field in the ClientDN subject in the certificate (for an eIDAS certificate it will begin with "PSD" followed by country code etc.). In code examples below, this unique id will be denoted 'yourClientId'.

The way you set up a client application to run with mutual TLS connections (including the format of certificate and private keys etc.) is highly dependent on your implementation framework, and can be tricky. However, you can initially probe whether the connected infrastructure allows you to reach the desired authentication endpoint by manually sending a request over mutual TLS, using the curl tool as follows:

curl -X POST https://sandbox-auth.jyskebank.dk/oauth-token \ -E <your_cert_in_PEM_format> --key <your_key_in_PEM_format> \ -H 'cache-control: no-cache' \ -d 'grant_type=client_credentials&client_id={yourClientId}&scope=pisprepare'

Notice that the -E and --key flags specify certificate and key files in PEM format. You may e.g. extract these from a PFX file containing your eIDAS certificate using openssl or other tools.
If the private key is encrypted, you will further need to add --pass <private_key_passphrase> to the curl command.

If you successfully receive a reply on the form

{"access_token":"{an_access_token}","scope":"pisprepare","token_type":"bearer","expires_in":35999}

then your certificate is correct and has been registered correctly, and you are able to obtain the 2-legged access token.

If you instead receive a reply on the form

{"error":"invalid_client","error_description":"No certificate presented for <yourClientID> "}

you did actually reach the endpoint, but the certificate or client id somehow doesn't match the registered ones.

If you receive any other kind of error, the problem is likely to be somewhere in the infrastructure, typically a proxy or firewall issue. You can add the -v option to curl to get more details on the attempted connection, check proxy logs or use other tools for debugging the network traffic.

If the curl command succeeds, but the application you are developing fails to connect, you should check that certificate and key formats are as expected by the framework you use, and that the request headers and payload match those of the curl command above.

If your application is in java it is also possible to setup TLS debugging by specifying -Djavax.net.debug=all. With TLS debug enabled it is possible to see all steps in the TLS handshake - e.g. whether the handshake is mutual TLS or normal TLS where only the server presents its certificate.

Two-legged authorization (Client-Server)

As described above, setting up a mutual TLS connection is a prerequisite for authenticating and obtaining a (2-legged) access token, which is issued using the OAuth 2 Client Credentials Grant Flow (Notice that the Client Credentials flow based on the eIDAS certificate asserts that the confidential client application can be trusted to keep the private key secret, i.e. that it runs on the TPP's secure servers and not e.g. on a mobile app or in a web page).

The issued token authorizes the TPP to make further requests against the PSD2 APIs.

Obtaining the 2-legged token can be be considered a pre-flow that is required for any PSD2 operation, but need only be carried out if a valid token (with the right scopes) has not yet been obtained or if the obtained token has expired.

Therefore, for efficiency, the TPP is encouraged to cache and reuse the obtained 2-legged access token for multiple calls. Always bear in mind, though, that any token is only valid for accessing the bank for which it was issued.

OAuth Client Credentials flow

To obtain an access token, the TPP must call the token endpoint for the relevant bank. To get the URI for the token endpoint, the TPP should obtain (GET) the 'well-known' OpenID discovery document from the bank-specific OAuth 2 Issuer at

https://{OAuth2Issuer}/.well-known/openid-configuration

e.g. https://auth.sydbank.dk/oidc/.well-known/openid-configuration (Note: OAuth2Issuer is constructed as "OAuth2AuthorizationServer/oidc", where the full list of OAuth 2 Authorization Servers can be found here.)

The JSON-structured reply contains the relevant URIs to call for obtaining access tokens in the various PSD2 flows. Specifically, the field 'token_endpoint' will contain the URI you need to call to obtain the 2-legged access token, e.g.

"token_endpoint":"https://auth.sydbank.dk/oauth-token"

After obtaining the URI for the token endpoint, the TPP must POST the following payload/body against the token endpoint:

  • grant_type=client_credentials
  • client_id={yourClientId}
  • scope={requested scopes}

The possible requested scopes are:

ScopeDescription
aisprepareFor use as AISP role.
pisprepareFor use as PISP role.
piisprepareFor use as PIISP role.
paisprepareFor use as PISP role without AISP role to get accountlist
 
If you need multiple scopes, you can supply them space-separated in the POST request; if you manually supply the HTTP entity-body in 'application/x-www-form-urlencoded' format, the full list of scopes should be 'scope=aisprepare+pisprepare+piisprepare', as '+' is the encoded value for a space. If, on the other hand, you use a specific client-credentials flow framework, you can probably set the scope value directly along these lines:
client_credentials_request.setScope("aisprepare pisprepare piisprepare")
Note that any scope that the TPP has not been authorized to use (in accordance with the scopes listed in the eIDAS certificate) will be filtered out so that the returned token will contain only scopes that are both requested and allowed.

Notice that the mutual TLS connection itself establishes the authenticity of the TPP, so no Authorization header (as exemplified in section 4.4.2) should be added in the request.

As described in the section about mutual TLS above, you'll either receive a JSON response where the 'access_token' field holds your 2-legged access token, or a JSON containing "error":"invalid_client" if you couldn't be authenticated as a pre-registered TPP.

In pseudo-code the client credentials flow seen from the TPP can be expressed as:

// Obtain token endpoint from OAuth configuration var issuer = $"{OAuth_2_Authorization_Server}/oidc"; // As specified on the 'API Calls' page var wellknown_json = HTTPClient.Get($"{issuer}/.well-known/openid-configuration"); var token_endpoint_url = wellknown_json["token_endpoint"]; // Set up parameters var scope = "aisprepare pisprepare"; // in this example the returned access-token can be used for calling e.g. initConsent and initPayment var url_encoded_content = new FormUrlEncodedContent(new[]{ new KeyValuePair("grant_type", "client_credentials"), new KeyValuePair("client_id", {yourClientId}), new KeyValuePair("scope", scope) }); var headers = new HTTPHeaders(new[]{ KeyValuePair("cache-control", "no-cache") }); var client = new HttpsClientConfiguredWithMutualTLS(); //...using your eIDAS certificate and private key // Request the token and handle the response var token_response = client.Post(token_endpoint_url, url_encoded_content, headers); if (!token_response.IsSuccessStatusCode) { // error handling } var client_credentials_access_token = token_response["access_token"]; // The obtained 2-legged token should be cached for reuse until expired

Three-legged authorization (User-Client-Server) 

In order for the end user (PSU) to authorize the TPP's requested PSD2 action (i.e. consent, payment or confirmation of funds) we use OpenID Connect Authorization Code Flow (see pseudo code example below).

Authorization Code Grant Flow

Whether the TPP needs to set up a PSD2 payment/CoF or a PSD2 consent, the initial flow is fairly similar.

Provided that a valid 2-legged access token with the relevant scope has already been obtained, the TPP will start the flow by calling the initiation endpoint on either the payment/CoF or account/consent product API (using mutual TLS and the 2-legged access token as authorization).

Furthermore, on all calls to any of the product APIs, the secret API key that was issued during TPP registration must be added in an 'x-api-key' header (as well as 'X-Request-ID' and any other requirements listed in the Berlin Group Specification).

After calling the initiation endpoint, the TPP will receive a JSON reply with a consentId (or a paymentId/CoF id) and a number of links including the API endpoint for initiating an actual authorization, stored in the JSON reply in "_link" - "startAuthorisation" (the relevant consent/payment/CoF id will be an integral part of this path).

The TPP can now initiate an authorization (that will involve Strong Customer Authentication by the PSU) by calling the supplied 'startAuthorization' endpoint path on the consent (or payment) product API. The response from the authorization initiation call will include the full URI to the OAuth configuration (stored in the JSON reply in "_links" - "scaOAuth") where a .well-known JSON discovery document can be fetched with a simple GET (see two-legged authentication above for details) and the authorization URI can be extracted (as Wellknown["authorization_endpoint"]).

(It should be noted that the first two calls in the flow might seem overly complex, but this design allows for multiple authorizations to be created based on the same consent/payment - which could be relevant in certain cases, for example when an authorization from several people is needed to perform a payment from a shared company account).

The TPP is now ready to start the Strong Customer Authentication by redirecting the PSU's user agent (browser) to the extracted authorization endpoint, including various parameters such as a state and codeChallenge (details in pseudo code below). The redirect must also include the 2-legged access token, a scope specified as "ais:<consentId>" (or "pis:<paymentId>" for a payment, "piis:<CoFId>" for a confirmation of funds) and the TPP's (pre-registered) redirect URI that will be called when the authorization completes.

Please note that the Berlin Group sets up some requirements for some of the optional choices in the OAuth flow. In version 1.3 of the implementation guide(navigate to 'archive' and publication date 2018-10-19), chapter 13 describes these requirements (for example, we require "S256" rather than "plain" for the PKCE code challenge, as outlined in the code example below). Here you will also find information on the structure of code_challenge & code_verifier. 

Assuming that a consentId has already been fetched, an authorization has then been initiated, and wellknown_json has been fetched from the URI returned in "_link.scaOAuth" in the reply (all as described above), then the OAuth flow seen from a TPP's perspective can be expressed (in pseudo code) as follows:

// The authorization endpoint is part of wellknown: var auth_endpoint = wellknown_json["authorization_endpoint"]; // OAuth Parameters: var request_state = getRandomString(32); // use this to prevent XSRF attacks (check against state value in response) var scope = $"ais:{consentId}"; // example is for a consent flow var verifier = getRandomString(44); // please note, this is also needed when handling the redirected OAuth response var code_challenge = base64UrlEncode(getSha256Hash(verifier)); // Ensure no padding in encoded code_challenge('=') // Construct the URI to which the PSU must be redirected: var redirectUri = $"{auth_endpoint}?response_type=code&client_id={yourClientId}&scope={scope}&state={request_state}&code_challenge_method=S256&code_challenge={code_challenge}&redirect_uri={yourRedirectUri}"; // Return a 302 to the endusers user-agent with the above redirectUri

What happens next is basically a black box to the TPP. The PSU's user agent will enter a flow directly with the authorization endpoint, where the end-user, in any number of steps, will be authenticated and authorize the operation requested by the TPP. Only after the end user has accepted or rejected the request, you will receive a call to the redirect URI you provided.

If the request was accepted, the request handler can find the authorization code and state in the query parameters.

Ultimately, the TPP will then use the authorization code to complete the OAuth authorization code flow and obtain a 3-legged access token. Note that the verifier used to create the code_challenge in the original redirect call is now sent to the token endpoint (under mutualTLS):

var response_state = getQueryString("state"); if (response_state != request_state) { // ... request_state from original auth init request (above) // Error handling; The state value should match the state you supplied in the request. } var auth_code = getQueryString("code"); var token_endpoint = wellknown_json["token_endpoint"]; var url_encoded_content = new FormUrlEncodedContent(new[]{ new KeyValuePair("grant_type", "authorization_code"), new KeyValuePair("code", auth_code), new KeyValuePair("code_verifier", verifier), // ... verifier from original auth init request (above) new KeyValuePair("client_id", {yourClientId}), new KeyValuePair("redirect_uri", {yourRedirectUri}) }); var client = new HttpsClientConfiguredWithMutualTLS(); //...using your eIDAS certificate and private key var token_response = client.Post(token_endpoint, url_encoded_content); var access_token = token_response["access_token"]; var refresh_token = token_response["refresh_token"];

The response from the token endpoint will include the 3-legged access token that can be used to carry out the PSD2 operation that the PSU authorized - e.g. perform a number of recurring account information requests.

Optionally, the response may also include a refresh token that can be used to obtain a new 3-legged access token if the old one is (or is about to be) expired.
Customer Authentication types

Until 6. December 2024:

The PSD2 authentication is divided into two types, which can be either private or corporate. So depending on the customer type the TPP can redirect the end user to the correct authentication type. If however the TPP does not supply any information about the customer type, the customer will first have to choose whether she/he is a private or a corporate user. If the TPP already knows the customer type, the TPP can, on behalf of the customer, skip this step. If the OAuth request for the code grant flow sent to Bankdata contains "acr=psd2", this indicates that the customer is a private customer, and the customer will then be sent directly to the private authentication page. If the OAuth request contains "acr=psd2_erhverv", then it is assumed, that the customer is a corporate user. Please note, that the values psd2 / psd2_erhverv are for the production environment, and that the corresponding values in sandbox are psd2_sandbox / psd2_sandbox_erhverv.

From 6. December 2024

The PSD2 authentication is divided into two types, which can be either private or corporate.
So depending on the customer type, the TPP must redirect the end user to the correct authentication type.
If the OAuth request for the code grant flow sent to Bankdata contains "acr=psd2", this indicates that the customer is a private customer, and the customer will then be sent directly to the private authentication page.
If the OAuth request contains "acr=psd2_erhverv", then it is assumed, that the customer is a corporate user.
Please note, that the values psd2 / psd2_erhverv are for the production environment, and that the corresponding values in sandbox are psd2_sandbox / psd2_sandbox_erhverv.

An example is as follows:

//redirect to private end user authentication. var redirectUri = $"{authEndpoint}?response_type=code&client_id={yourClientId}&scope={scope}&state={request_state}&code_challenge_method=S256&code_challenge={codeChallenge}&redirect_uri={yourRedirectUri}&acr=psd2"; //redirect to corporate end user authentication. var redirectUri = $"{authEndpoint}?response_type=code&client_id={yourClientId}&scope={scope}&state={request_state}&code_challenge_method=S256&code_challenge={codeChallenge}&redirect_uri={yourRedirectUri}&acr=psd2_erhverv";


Language

A language parameter can also be set in the OAuth request during the code grant, as specified in the OpenID Connect specification. Built-in texts in the authentication flow will be shown in the requested language, if supported.

The supported language codes are "DA" for Danish, "EN" for English and "DE" for German.
Notice that MitID authentication specifically does not support German so the language in the MitID dialogs will in that case be set to English (even though other dialogs showed to the user during the login / authorization flow may be shown in German).

Examples is as follows:

// set displayed to end user language to Danish. var redirectUri = $"{authEndpoint}?response_type=code&client_id={yourClientId}&scope={scope}&state={state}&code_challenge_method=S256&code_challenge={codeChallenge}&redirect_uri={yourRedirectUri}&ui_locales=DA"; //set displayed to end user language to English. var redirectUri = $"{authEndpoint}?response_type=code&client_id={yourClientId}&scope={scope}&state={state}&code_challenge_method=S256&code_challenge={codeChallenge}&redirect_uri={yourRedirectUri}&ui_locales=EN"; //set displayed to end user language to German. var redirectUri = $"{authEndpoint}?response_type=code&client_id={yourClientId}&scope={scope}&state={state}&code_challenge_method=S256&code_challenge={codeChallenge}&redirect_uri={yourRedirectUri}&ui_locales=DE";

Diagram of a PSD2 flow

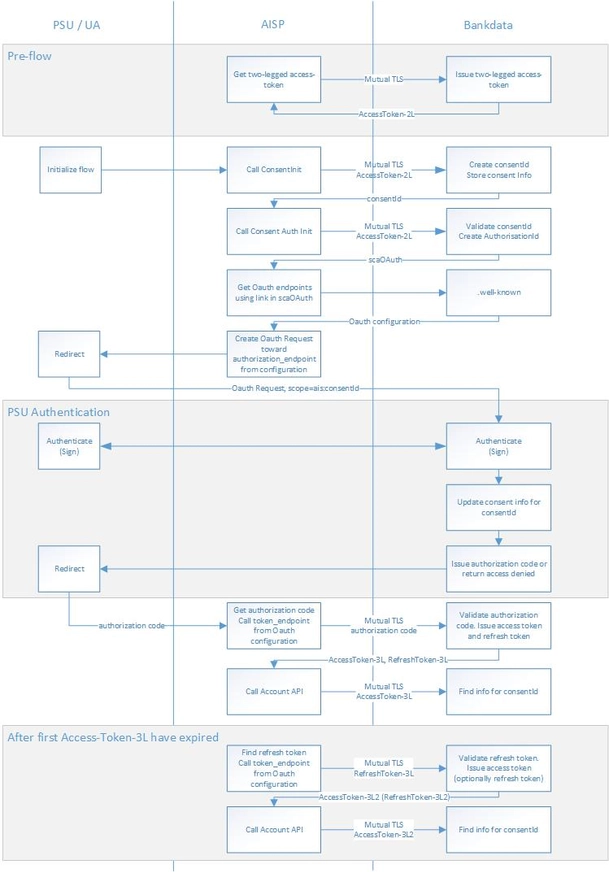
The following diagram shows a PSD2 account consent flow as also described in pseudo-code examples and detailed explanations in the sections above-

The first box denoted 'Pre-flow' depicts the relatively simple process of obtaining a 2-legged access token, as described under "Two-legged authorization (Client-Server)" above. This flow need only be repeated whenever a valid 2-legged access token for the rest of the flow is not at hand.

The following part of the flow is used to perform a Strong Customer Authentication and authorization by the PSU and obtain a 3-legged access token. The box denoted 'PSU Authentication' in the middle of this flow illustrates the 'black box' part of the flow where the PSU interacts directly with the PSD2 authentication services, transparently to the TPP. Only at the end of the authentication, control will be redirected back to the TPP, where the returned authorization code can be exchanged for a 3-legged access token (over mutualTLS).

After this, the TPP can use the 3-legged access token to call the PSD2 specific product APIs as authorized by the PSU, e.g. to request information about accounts, transactions and balances. (Note that consent and payment APIs must be called with the 2-legged access token, and account APIs must be called with a 3-legged access token - so the rule of thumb is that the 2-legged access token must be provided for all requests towards the consent and payment APIs, or whenever the scope is one of the prepare scopes (aisprepare, pisprepare, piisprepare, paisprepare). The 3-legged access token is only used for the requests against the account APIs with "ais:{consentId}" scope.)

The very last box in the flow diagram depicts the flow used when the 3-legged access token has expired and the TPP has an associated refresh token, that can simply be posted against the token_endpoint to get a new 3-legged access token (and optionally a new refresh token) in exchange (by sending the client id and refresh token over mutual TLS, using grant_type=refresh_token in accordance with the OAuth refresh token flow.)

Diagram of a PSD2 flow